How to replace the lamp on an ACQUITY UPLC FLR Detector - WKB292227
OBJECTIVE or GOAL
How to replace the lamp on an ACQUITY UPLC FLR Detector
ENVIRONMENT
- ACQUITY UPLC FLR Detector
- 2475 Multi-Wavelength Fluorescence Detector
PROCEDURE
Change the lamp when it repeatedly fails to ignite or when the detector fails to calibrate.
Removing the lamp
Required materials
• Phillips screwdriver
To remove the lamp module:
Warning: To avoid eye injury from ultraviolet radiation exposure, power-off the detector before changing the lamp; wear eye protection that filters ultraviolet light and keep the lamp in the housing during operation.
Warning: To prevent burn injuries, keep the lamp in its housing when handling the lamp.
1. In the left-hand pane of the console, click FLR Detector, and then click the Lamp Off icon to power-off the lamp.
Result: The green LED on the console darkens, as does the lamp LED on the door.
2. Open the detector's door by gently pulling its right-hand edge toward you.
3. To help the lamp cool more quickly, open the lamp access door with a small, flat-blade screwdriver.
Warning: To prevent burn injuries from the lamp and its housing, which get extremely hot during operation causing increased gas pressure inside the lamp, allow the lamp to cool for 60 minutes before removing it.
4. Allow the lamp to cool for 60 minutes
Tip: Leaving the detector powered-on while the lamp is cooling allows the fans to keep running, which helps the lamp cool more quickly.
Notice! Do not grasp the connector by the wire. Doing so can damage the connector or cable.
5. Power-off the detector and disconnect the power cable from the rear panel.
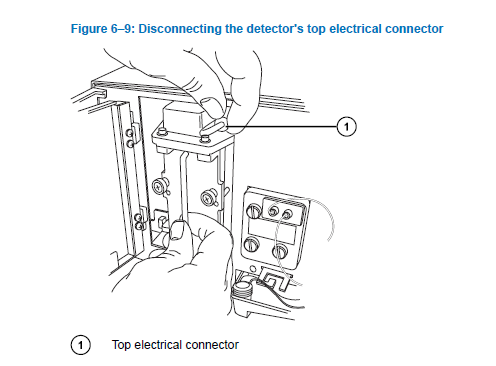
6. Gently pull the top electrical connector straight out.
Figure 6–9: Disconnecting the detector's top electrical connector
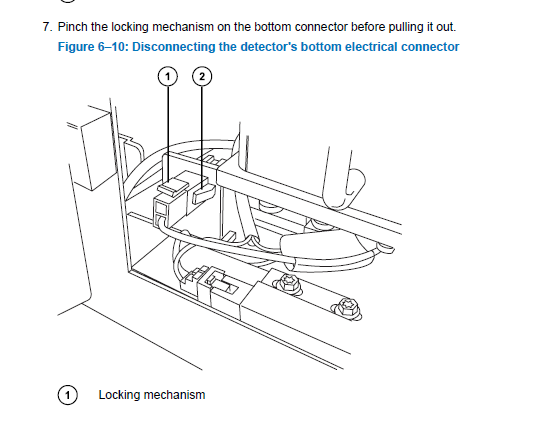
7. Pinch the locking mechanism on the bottom connector before pulling it out.
Figure 6–10: Disconnecting the detector's bottom electrical connector
Warning: To prevent burn injuries, keep the lamp in its housing when handling the lamp.
8. Using the Phillips screwdriver, loosen the two captive screws on the lamp housing.
Figure 6–11: Loosening the lamp housing's screws

Warning: To avoid injury, always keep the detector lamp facing away from you when removing it.
9. Gently withdraw the lamp from its housing.
Installing the lamp
Warning: The lamp contains mercury. Do not dispose of the lamp in municipal waste. Refer to your local environmental laws regarding disposal and recycling of lamps that contain mercury. Warning: Lamp gas is under positive pressure. To avoid shattering the glass, use care when disposing of the lamp. Waters suggests that you adequately cushion the old lamp by containing it in the packaging of its replacement before you dispose of it.
Notice: Wear powder-free gloves when you unpack and prepare the lamp for inserting into the detector. Skin contact with the bulb reduces lamp life.
Notice: To avoid diminishing the lamp's effectiveness, do not touch the glass bulb. If the bulb requires cleaning, gently rub it with ethanol and lens tissue. Do not use abrasive tissue. Do not apply excessive pressure.
Required materials
• Phillips screwdriver
• Lamp
To install the lamp:
1. Without touching the bulb, unpack the new lamp from its packing material.
2. Inspect the new lamp and lamp housing.
3. Record the serial number, which is located on a label attached to the lamp connector wire.
4. Reconnect the bottom lamp power connector, ensuring that it locks into place.
5. Reconnect the top lamp power connector.
6. Position the lamp cartridge and insert it in the housing Tip: No additional alignment is required.
7. Push the lamp forward gently, until it bottoms into position.
8. Using the Phillips screwdriver, tighten the two captive screws.
9. Close the lamp access door.
10. Power-on the detector, and then wait about 30 minutes for the lamp to warm before resuming operations.
Tip: Cycling power to the detector (powering-off and then powering-on the instrument) initiates the verification procedures.
11. In the console, select Maintain > Change Lamp. 12. Click New Lamp.
13. Specify the serial number for the new lamp (see the label attached to the lamp connector wire), and then click OK.
Tip: If you do not record a new lamp’s serial number in the system console, the date of the previous lamp installation remains in the detector’s memory, voiding the new lamp’s warranty.
Once installed, you need to perform the detector calibration and normalisation procedures - see below.
How to perform the wavelength calibration test on an ACQUITY UPLC FLR detector - WKB238326 - Waters
How to perform the ACQUITY UPLC FLR detector emission units normalization test - WKB238324 - Waters
ADDITIONAL INFORMATION
Click here to view procedure in the ACQUITY FLR Operator Guide.
id292227, 2475, 2475B, A-10FL, A-30FL, UPFLRARC, UPFLRDET, UPPFLR