How to activate and deactivate Empower software licenses and options (with or without internet access) using the Waters Licensing Wizard - WKB1918
OBJECTIVE or GOAL
Activate or Deactivate Empower Licenses and Options
ENVIRONMENT
- Empower 2 Feature Release 5 (FR5) and later
- Breeze 2
- Empower 3 Base through Empower 3.6.1
- Empower QS
- Empower QSN
- Empower 3.7.0 (see below for important changes beginning with Empower 3.7.0)
PROCEDURE
To activate licenses and options for Empower follow the steps below.
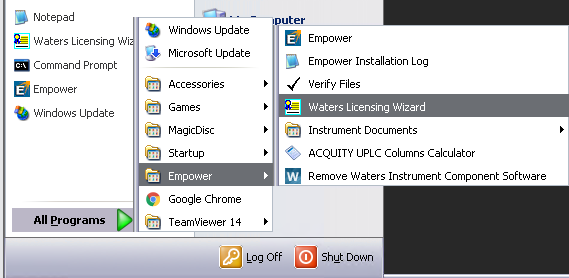
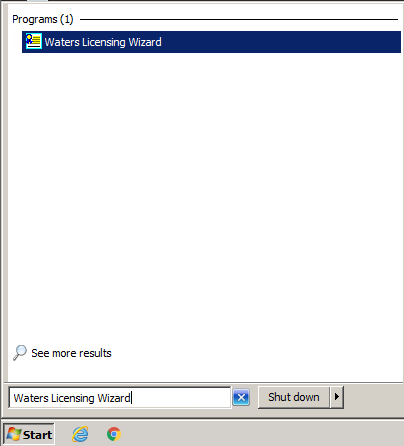
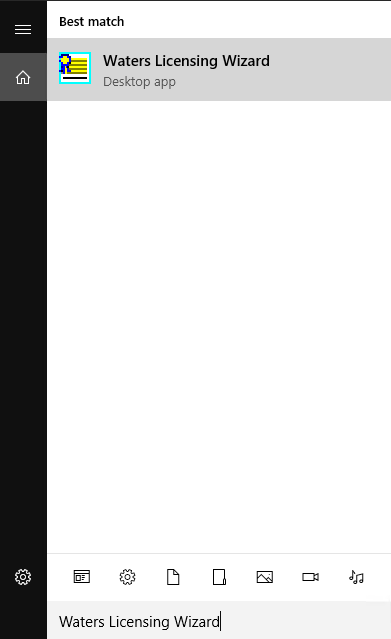
1.Login to Windows as a full local admin. Locate Waters Licensing Wizard using the by Navigating to Empower > Waters Licensing Wizard or by using Windows Search features in the Start Menu
Windows XP
Windows 7
Windows 10
2. On the Waters Licensing Wizard login page, enter the default username and password, leaving Local as the database parameter.
For Empower Workstation/Personal installations the database value will be 'Local'
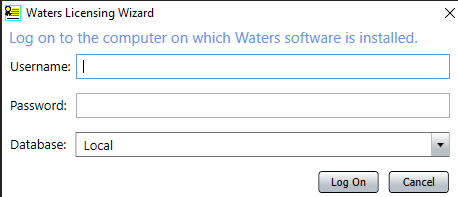
For Empower Workgroup and Enterprise installations the database value must be correct.
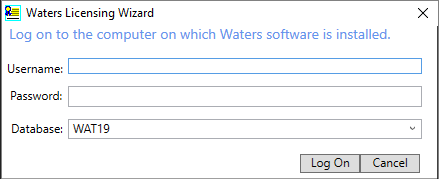
Empower software provides a default Empower user account that can be disabled but not remove from the software. The default username for the account is "system", and the default password is "manager". When logging in to the licensing wizard for the first time, enter the default username and password. Subsequently, any user with the Administrator privilege can access the Waters Licensing Wizard.
3. Enter the Username and Password and click Log On.
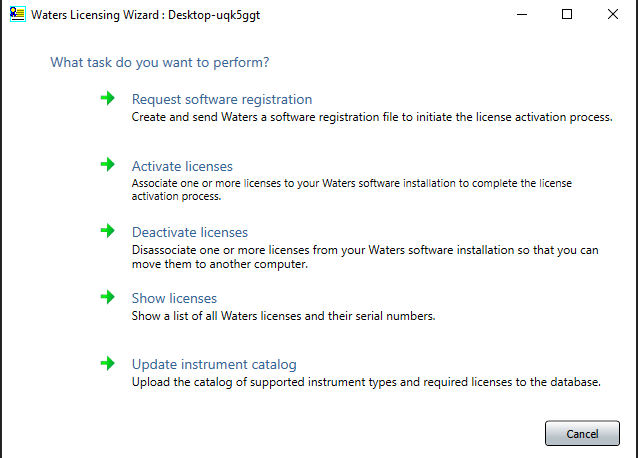
4. On the task page, click "Request software registration".
5. On the "Request software registration: Create registration file" page, select a valid name and location for the software registration file, and then click Next. The software registration file must be generated on an Empower computer connected to the database to be licensed.
Tip: The path should NOT include a period ('.').
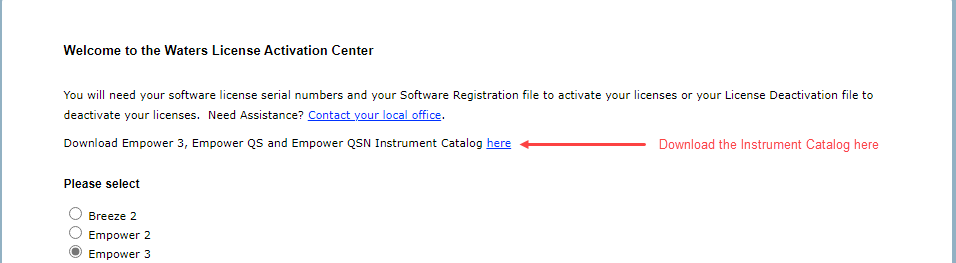
6. When the "Request software registration: Registration file created" page appears, click the URL to be directed to the Waters License Activation Center web site.
If the computer has Internet access, it connects to the Waters license Activation Center Web site to complete the request process and receive the license activation file.
If the computer does not have Internet access, move the software registration file to a computer with Internet access, and then connect to the Waters License Activation Center Web site https://www.waters.com/activate/licenseintro.htm
Note: Follow the instructions on the Waters License Activation Center to obtain the license activation file.
7. The License Activation Center Web site provides the license activation file. Download the activation file to a location accessible to the Empower computer, log in to the Waters Licensing Wizard (see step 1), and select Activate licenses.
8. Browse to and select the license activation file downloaded from the Waters License Activation Center website, and then click Next.
Result: On the License Activation Complete page, a list of successfully activated licenses and options appears.
9. Click Finish.
Tip: To view active licenses and options, use the Show licenses option in the Waters Licensing Wizard.
License Activation changes beginning with Empower 3.7.0
Beginning with Empower 3.7.0 the Empower CDS Instrument Catalog is required for use as part of licensing your chromatographic systems. The Empower CDS Instrument Catalog must be downloaded from the Waters License Activation Center Web site. It is recommended that the Empower CDS Instrument Catalog File be downloaded and uploaded to Empower each time licenses are activated. To download the Empower CDS Instrument Catalog, navigate to the Waters License Activation Center website. https://www.waters.com/activate/licenseintro.htm.
Upload the Instrument Catalog by launching the Waters Licensing Wizard and selecting Update Instrument Catalog.
At this point Empower can be licensed using steps 1-9 above.
Deactivating Empower licenses and options
To remove or transfer an Empower license currently in use it must first be deactivated before it can be used in a different Empower installation.
Note: Deactivating the base software license automatically deactivates and removes all user licenses, system licenses, and option licenses.
To deactivate a license or option:
Note: It is recommended to run Empower Verify Files before deactivating any licenses so there is a copy of all the license serial numbers.
1. Locate Waters Licensing Wizard using the by Navigating to Empower > Waters Licensing Wizard or by using Windows Search features in the Start Menu
Windows XP
Windows 7
Windows 10
2. On the Waters Licensing Wizard login page, enter the default username and password, leaving Local as the database parameter.
For Empower Workstation/Personal installations the database value will be 'Local'
For Empower Workgroup and Enterprise installations the database value must be correct.
3. Enter the Username and Password and click Log On.
4. On the task page, click Deactivate licenses.
5. On the "Deactivate Licenses: Select Licenses" page, check the options to deactivate, and then click Next.
6. On the "Deactivate licenses: Create deactivation file" page, select a valid name and location for the license deactivation file, and click Next.
Tip: This file stores license deactivation information.
7. When the "Deactivate Licenses: Deactivation file created" page appears, note the file location, and then click the address link.
If the computer has Internet access, it connects to the Waters License Activation Center Web site to complete the deactivation process.
If the computer does not have Internet access, move the license deactivation file created to a computer with Internet access, and then connect to the Waters License Activation Center Web site https://www.waters.com/activate/licenseintro.htm.
8. Follow the instructions to deactivate the license(s).
Result: When the process is complete a confirmation page appears that lists all deactivated licenses and options.
ADDITIONAL INFORMATION
Please see the article "Important Updates to Empower Licensing beginning with Empower 3.7.0" for details of the changes to licensing in Empower 3.7.0
It is good practice to save the registration and activation files in a folder on the computer for troubleshooting purposes.
How to activate Named User licenses within multiple Empower 3 databases WKB235552
Search Terms:
How do I activate licenses in Empower?
How do I activate serial numbers in Empower?
How do I activate user licenses?
How do I activate a license in Empower?
How do I activate serial numbers in web licensing wizard?
How do I use the Waters Licensing Wizard?