How do I switch from ACQUITY I-Class to ACQUITY UPC2 and back on a Xevo type MS system? - WKB7768
Article number: 7768
OBJECTIVE or GOAL
On a quadrupole mass spectrometry system, allow for switching between an ACQUITY UPLC I-Class or ACQUITY UPLC H-Class and an ACQUITY UPC2.
ENVIRONMENT
- Xevo TQD
- Xevo TQ-S
- Xevo TQ-S micro
- Xevo TQ MS
- Xevo TQ-S cronos
- ACQUITY UPLC H-Class
- ACQUITY UPLC I-Class
- ACQUITY UPC2
- MassLynx
PROCEDURE
Note: These instructions assume that the ICS has been installed for both the ACQUITY UPC2 and the ACQUITY I-Class / ACQUITY UPLC H-Class. Where I-Class is mentioned also consider this to include the H-Class instrument
- Assuming that the I-Class is currently configured (if swapping back from ACQUITY UPC2 to ACQUITY I-Class, follow steps 2 through 9 and then skip to step 29).
- Open the inlet editor in MassLynx.
- Under Tools, select Instrument configuration.
- Select Configure.
- In the Wizard, click Next.
- Choose None for pump and click Next.
- Choose None for autosampler and click Next.
- Remove any configured detectors from the list and click Next.
- Select Finish.
- Exit MassLynx and power-down your I-Class components.
- Move the computer Ethernet cable and the mass spectrometer Ethernet cable to the back of the UPC2 Sample Manager.
- Turn on the ACQUITY UPC2 sample manager and then other components.
- if you have a 515 makeup pump, turn it on and make sure that the run light is off. Then turn on the 515 and set to Rem Run.
- Reboot the MS using Telnet.
- When communications are re-established with the mass spectrometer, reopen MassLynx.
- Open the inlet editor in MassLynx.
- Under Tools, select Instrument configuration.
- Select Configure.
- In the Wizard, click Next.
- Assuming you have a makeup pump for the UPC2, select Waters Pump control for the pump. If no makeup pump is present, select ACQUITY UPC2 Binary Solvent Manager for pump and click Next.
- Select Waters ACQUITY Sample Manager for autosampler and click Next.
- In the Select Detectors window, select ACQUITY Convergence Manager first, Waters ACQUITY CM second, and your Waters ACQUITY detector last. The order must be correct or the system will not initialize correctly.
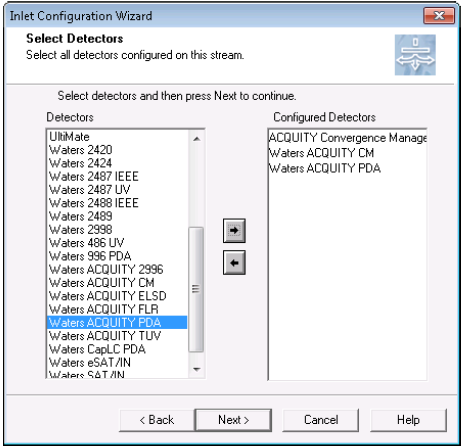
- Click Next
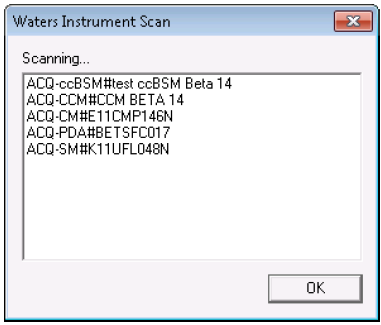
- From the Configure Communications screen, click Scan for Instruments. When they all come up, click OK.
- Assign the correct serial numbers to the ACQUITY Column Manager and ACQUITY PDA or TUV. The Convergence Manager stays at None.
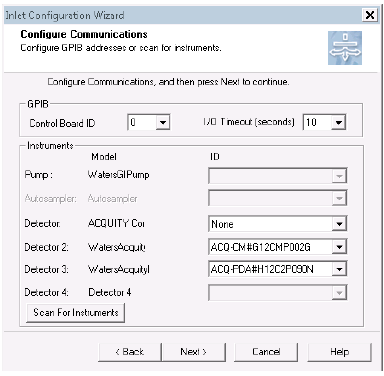
- Click Next.
- Click Finish on the inlet configuration dialog box.
- The ACQUITY UPC2 should now be configured, except for the Waters pump control if a makeup pump was configured.
- To switch back to ACQUITY I-Class follow steps 2 through 9.
- Exit MassLynx.
- Close off the CO2 supply so there is no flow to the UPC2.
- Turn off all UPC2 components but leave the MS on.
- Swap the computer Ethernet cable and the MS Ethernet cable back to the I-Class sample manager.
- Reboot the controlling PC.
- Turn on the sample manager first and then the other components in the I-Class system.
- Reboot the MS using Telnet.
- When communications are re-established with the Xevo TQD, reopen MassLynx.
- Open the inlet editor.
- Under Tools, select Instrument configuration.
- Select Configure.
- In the Wizard, click Next.
- Choose ACQUITY BSM for pump and click Next.
- Select Waters ACQUITY Sample Manager for autosampler and click Next.
- In the Select Detectors window, select your ACQUITY CM if you have a column manager and then your ACQUITY detector/detectors.
- Click Next.
- From the Configure Communications screen, click Scan for instruments. When they all come up, click OK.
- Assign the correct serial numbers to the ACQUITY Column manager (if you have one) and the ACQUITY PDA or TUV.
- Click Next.
- Click Finish on the inlet configuration dialog box.
ADDITIONAL INFORMATION