How to clean the source ion block on a Xevo TQS, Xevo G2-S, Xevo G2-XS, Xevo G3, Xevo TQ-S, Xevo TQ-S micro, Xevo TQ-XS, Synapt G2-S, or Synapt G2-Si - WKB5702
Article number: 5702
OBJECTIVE or GOAL
Remove and clean the ion block on a stepwave source.
ENVIRONMENT
- MassLynx
- Xevo TQ Absolute
- Xevo TQ-XS
- Xevo TQ-S
- Xevo TQ-S micro
- Xevo G2-S QTof
- Xevo G3 QTof
- Synapt G2-S QTof
- Synapt G2-Si QTof
- Vion IMS QTof
PROCEDURE
- Set the source temperature to 40 °C on the Advanced tab for triple quads and on the ES tab for QTofs. Allow 30 minutes to cool.
- Set the instrument to Standby (red) and turn off the API and collision or trap gas.
- Pull up the vacuum readings (view > vacuum on QTofs and Setup > vacuum monitor on triple quads) and take a screen capture of the vacuum readings.
- Go to the Tune page and select Vacuum and Vent.
- Disconnect the fluidics lines to the probe or probes.
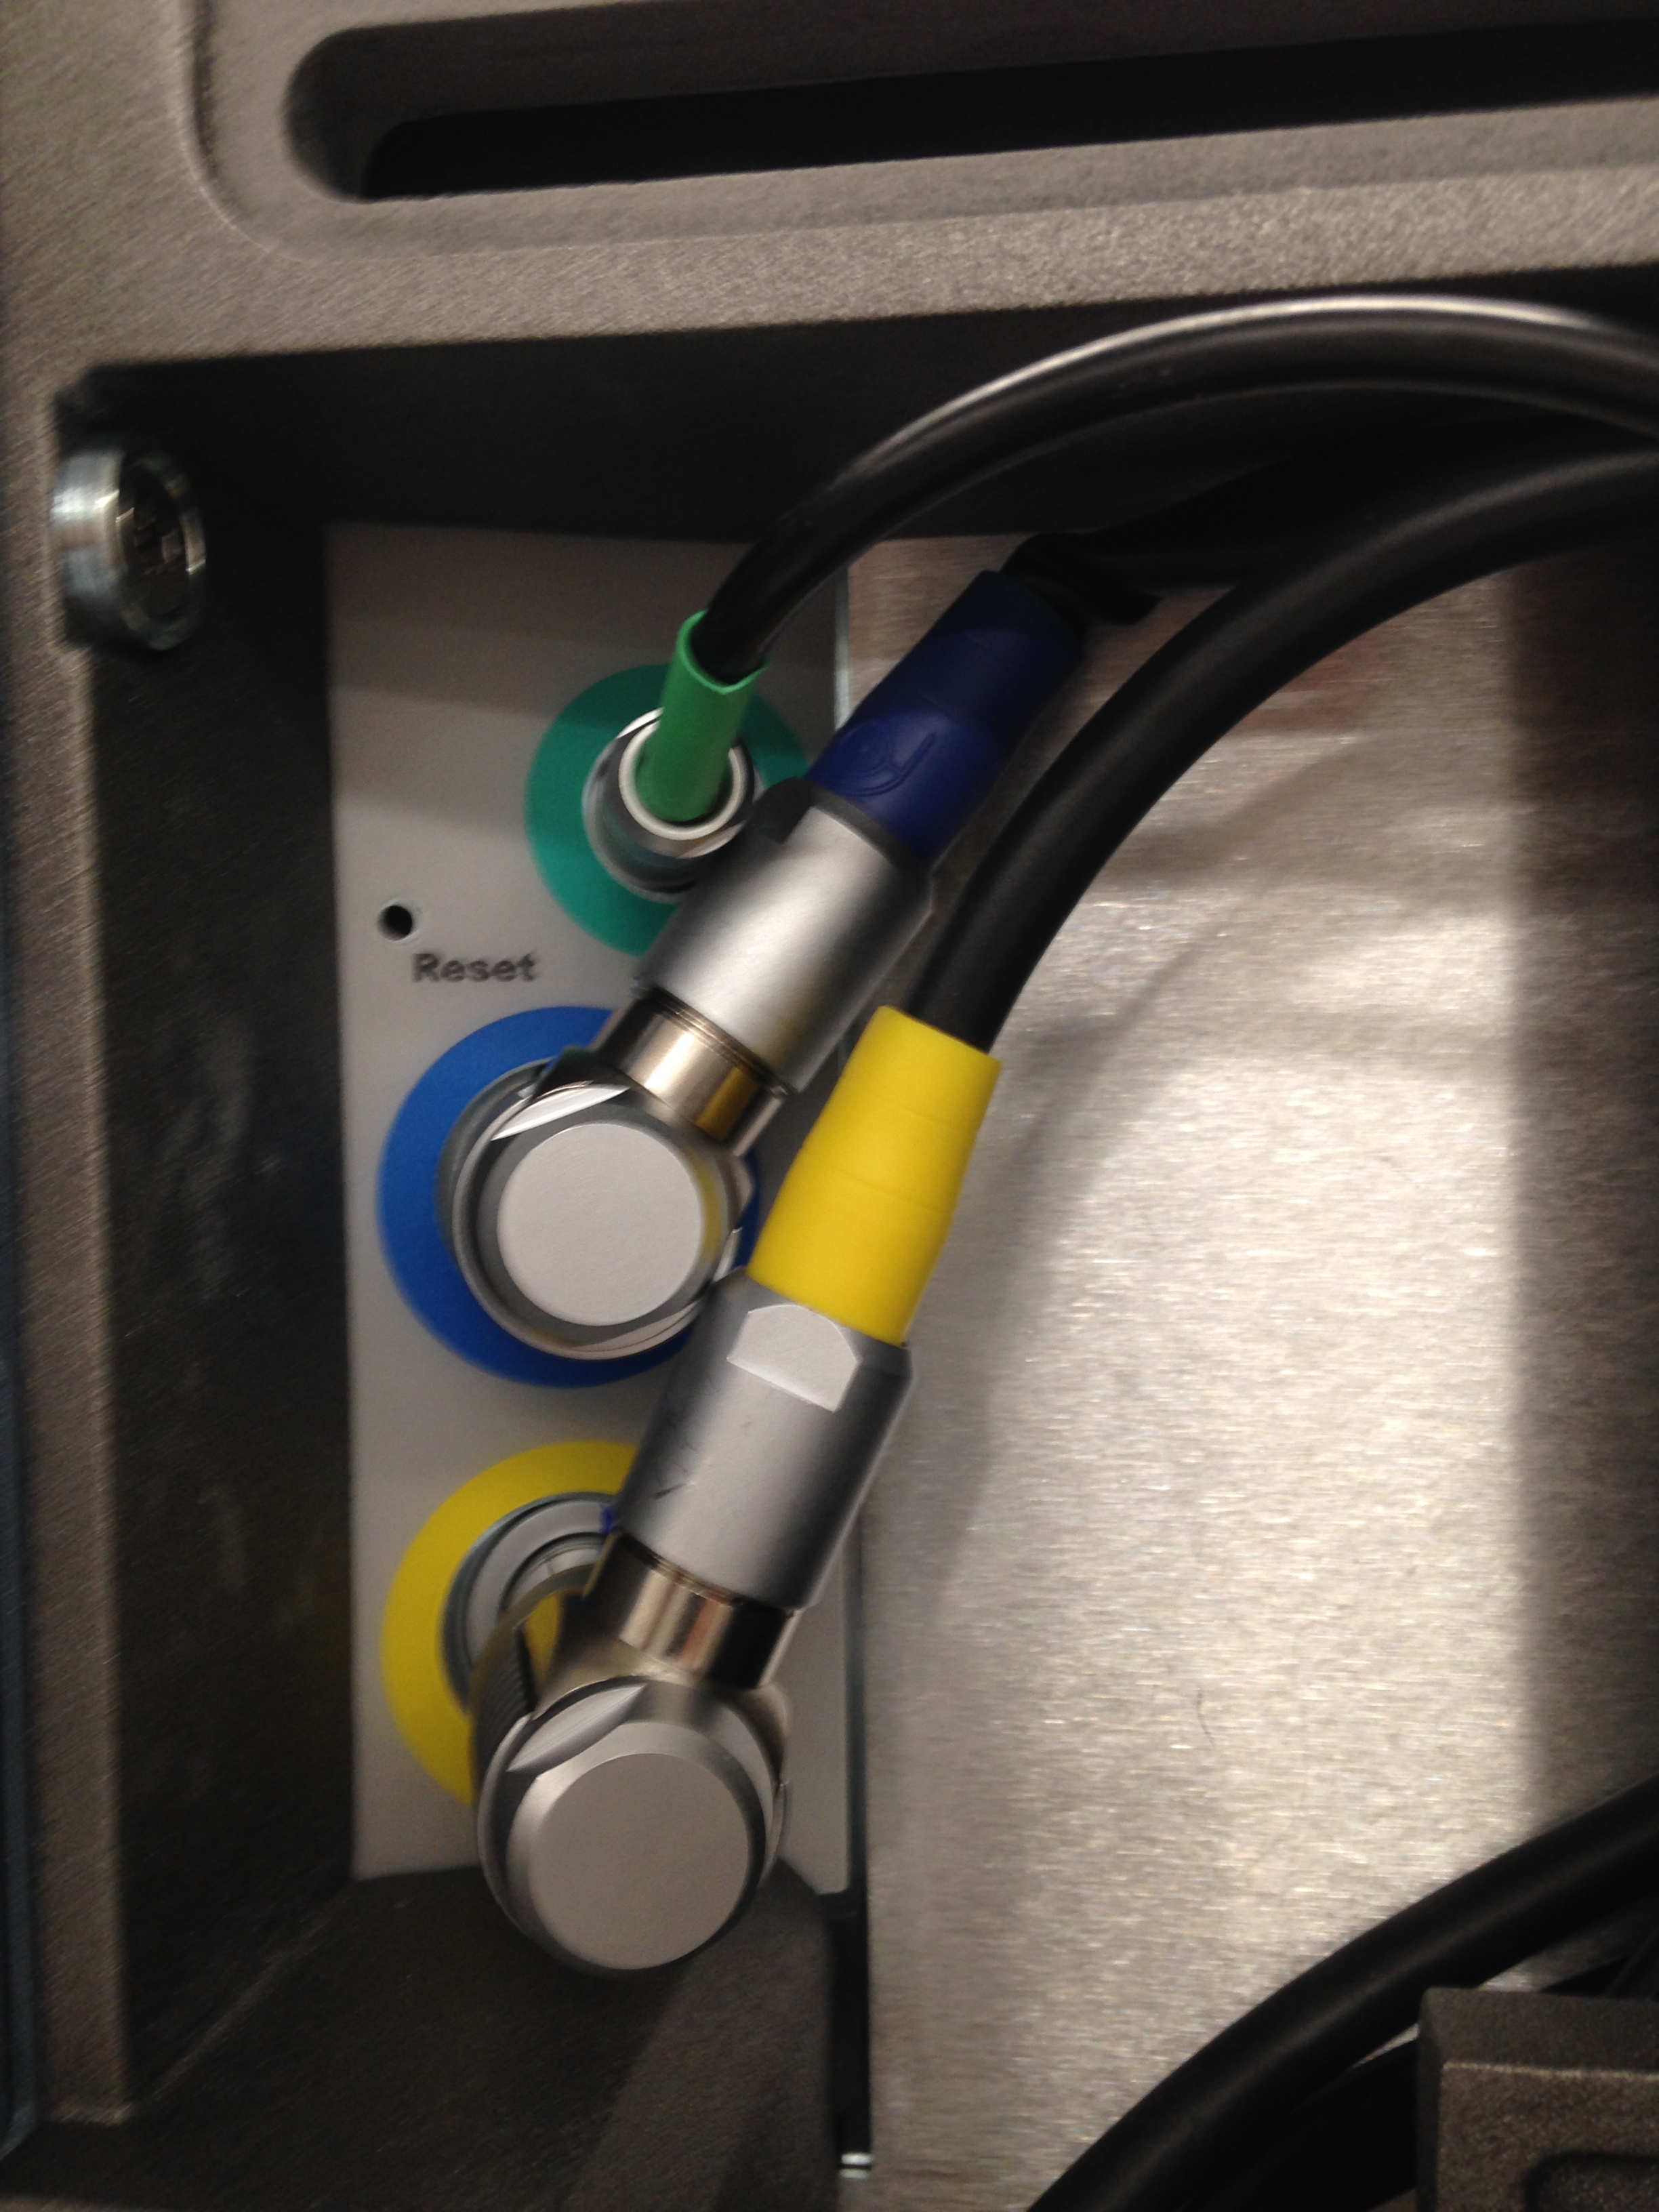
- Disconnect the power cables that go to the mass spectrometer from the source enclosure or probe (two for triple quads and four for QTofs).
- Remove the source enclosure.
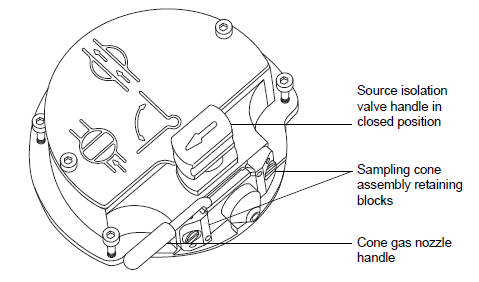
- Close the source isolation valve.
- Vent the instrument from the tune page by selecting vacuum > vent. Allow five minutes to soft vent the nitrogen gas.
- Ensure that it says "vented" at the bottom of the Tune page before proceeding.
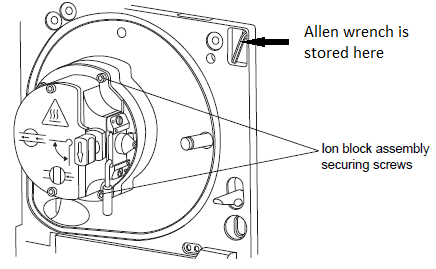
- Be sure to wear nitrile gloves while handling the source. Use the combined 2.5 mm hex wrench and cone extraction tool to unscrew the four captive screws securing the ion block assembly.
- Remove the ion block assembly from the PEEK block support and set it down on a plain piece of unused printer paper.
- With the source isolation valve still closed, remove the sample cone.
- Grasp the PEEK cone gas nozzle handle and rotate it 90 degrees.
- Pull up and slide the sample cone assembly out of the ion block assembly.
- Place your other hand under it so that the sample cone does not fall on the floor.
- Separate the sample cone from the sample cone nozzle using the cone extraction tool.
- Remove the o-ring and the PEEK handle. Set aside the black o-ring for later.
- Use the combined 2.5 mm hex wrench to loosen the two captive screws securing the ion block cover plate and remove the cover plate. Be sure to remove all gold screws completely.
- Remove the two gold screws from the sample cone assembly retaining blocks. Be careful not to lose any of the wavy washers that sit behind these screws.
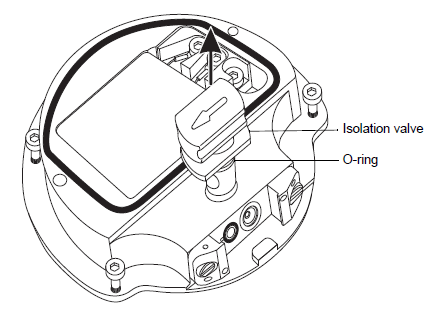
- Grasp the isolation valve and pull it out of the ion block.
- Use the 2.5 mm hex wrench to remove the screw furthest to the right securing the heater terminal to the ion block.
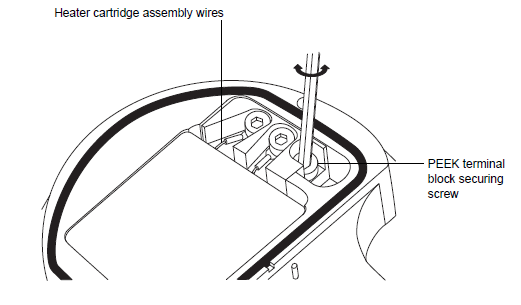
Notice: To avoid damaging the heater cartridge assembly wires, do not bend or twist them while removing the heater cartridge assembly and ceramic heater mounting block from the ion block.
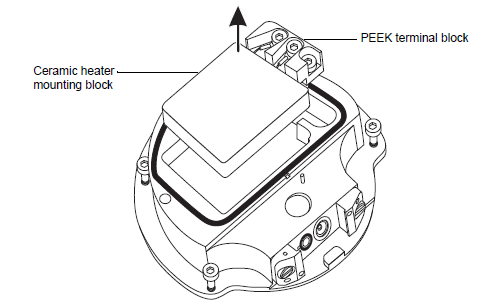
- Carefully remove the PEEK terminal block and ceramic heater mounting block, complete with heater cartridge assembly, from the ion block. Note: Inverting the ion block facilitates this process.
- Remove any black rubber o-rings. The Teflon coated o-rings can be left in during cleaning, but ensure that all gold screws are completely removed.
- Immerse the ion block in one beaker and sample cone nozzle in a separate beaker. Sonicate for 30 minutes in each of the following washes:
- Sonicate with 1:1:1 methanol/water/formic acid. Note: Rinse well with milli-Q water to remove the formic acid.
- Sonicate in 50/50 methanol/water.
- Sonicate in methanol.
Note: If the ion block is excessively dirty, scrub with a toothbrush or cotton swab.
- The gold source isolation valve cannot be cleaned in formic acid, but can follow the remaining washes if desired. The o-ring can be left on and the PEEK handle removed after loosening the grub screw. If removing the o-ring, be sure not to damage or tear it in any way.
- While still wearing gloves, remove each component with tweezers and blow it dry with an inert, oil-free gas, like nitrogen.
- Inspect each component and, if irregularities are still visible, repeat the above cleaning with a higher percentage formic acid, or replace.
- Reassemble the source by first fitting the PEEK terminal block with the ceramic heater mounting block and heater cartridge assembly into the ion block.
- Use the 2.5 mm hex wrench to tighten the screw that holds the PEEK terminal block to the ion block.
- Ensure the terminal block/heater bolts are fastened correctly and none of them touch the ion block cover plate when fitted to prevent a short with the ion block.
- Ensure that the grooves the o-rings fit into are lint- and debris-free and install the o-rings on the ion block, isolation valve, and sample cone.
- Fit the isolation valve to the ion block.
- Fit the ion block cover plate to the ion block assembly, and then tighten the two gold screws that hold it in place using the 2.5-mm hex wrench.
- Fit the sample cone assembly retaining blocks to the ion block using the two short gold screws with wavy washers and the 2.5-mm hex wrench.
- Reassemble the sample cone assembly: Hold the sample cone assembly by the PEEK handle and orient it so that it is perpendicular to the ion block. Slide it flush to the ion block and rotate it 90 degrees until it is locked in position.
- Confirm that all PEEK support block o-rings are still in position and are lint- or debris-free. If necessary, remove any lint using a kim wipe wet with a small amount of methanol.
- Fit the ion block to the PEEK ion block support.
- Use the 2.5-mm hex wrench to screw in the four gold captive screws to secure the ion block to the PEEK block. Be sure to tighten the screws sequentially and in small increments, one small turn each before moving on to the next.
- Fit the source enclosure and close it.
- Connect the probe and source enclosure cables to the mass spectrometer.
- Go to the Tune page and select vacuum > pump (for quad systems). QTofs are pumped down through the ACQUITY console by pressing Operate. Note: The turbo speed should get to 100% within three minutes for a triple quad, and within five minutes for a QTof.
- Ensure that the collision or trap gas is on.
- After an hour, open the source isolation valve.
- Ensure that the vacuum is close to the starting vacuum before going into Operate.
ADDITIONAL INFORMATION
Ion Block assembly:

id5702, MALDIG2SI, MLYNX, MLYNXV41, SUPMM, SYNG2SHD, SYNG2SHDML, SYNG2SIHD, SYNG2SIMS, SYNG2SMS, SYNG2SMSML, VION, XEVOG2SQTF, XEVOG2STOF, XEVOG2XSQT, XEVOG2XSTF, XEVOG3QTOF, XEVOTQA, XEVOTQS, XEVOTQSIVD, XEVOTQSMIC, XEVOTQXS, XEVTQSMIVD, XEVTQXSIVD