Alliance valve V1 or V2 leaks - WKB119907
SYMPTOMS
- Salt or mobile phase pooling under the High Pressure Motor Valves (HPMV) V1 or V2 valve due to internal leak at V1 or V2
ENVIRONMENT
- Alliance HPLC System
- 2695 Separations Module
CAUSE
Leaking/damaged internal high pressure seal
FIX or WORKAROUND
- Rebuild valve V1 or V2.
- Perform seal adjustment.
ADDITIONAL INFORMATION
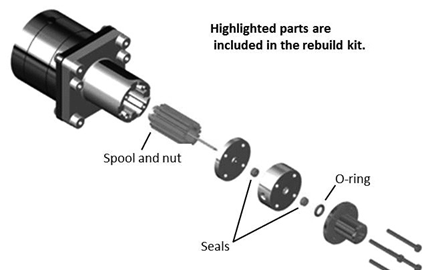
The part number of the rebuild kit is WAT045424.
Rebuilding the V1 Valve on the Waters 2695 Separations Module
Required Tools and Materials
V1 Valve Rebuild Kit (Part Number: WAT045424)
HPMV Tool Kit (Part Number WAT045427)
T10 Torx wrench
Methanol
Wood screw
Small pointed object

Procedure
Review the safety advisories before beginning the procedure.
Warning: To prevent personal contamination with biologically hazardous or toxic materials, carefully dispose of the replaced component in the appropriate waste container.
Warning: To avoid contact with solvents, wear suitable gloves and safety glasses.
Warning: To avoid electric shock when performing any maintenance, remove power to the unit by powering‐down and disconnecting the power cord.
Warning: Dispose of components in accordance with local or customer regulations.
Important: Always observe Good Laboratory Practice and, when handling Waters Critical Clean™ parts.
Procedure
1. Remove the top and right-side panels from the instrument.
2. Disconnect the tubing connections at the appropriate HPMV ports.
3. Using a T10 Torx wrench, remove the four mounting screws on the face of the HPMV.
4. Remove the nose cap from the valve by gently pulling it forward.
5. Remove the seal body and backing plate in the same manner.
6. From the Main Idle screen, select Diag Page. The Diag window opens.
7. Select Other Tests.
8. Move the cursor to Rebuild Injector Valves, then press Enter.
9. Use the arrow key to select Valve 1 or Valve 2.
10. Press the Valve Reverse key three times to move the spool forward. Remove the spool from the valve housing.
11. Place a new spool and nut assembly into the housing so the slot in the plastic housing aligns with the pin inside the valve housing.
12. Press the Valve Forward key three times to draw the spool into the valve housing.
Reassembling the HPMV
1. Reinstall the backing plate with the small, raised diameter side facing out. Align the holes in the plate with the mounting hole in the housing.
Note: It is important to orient the backing plate with the small, raised‐diameter side out to properly support the seal in the seal body.
2. Place the insertion bullet into the end of the spool.
3. Remove old seals from the seal body by screwing the wood screw into a seal, then pulling the seal out.
4. Place the seal guide over the valve body.
5. Place a seal onto the seal punch, with the Oring side of the seal facing away from the punch.
6. Place a small amount of methanol into the seal body and onto the seal.
7. Carefully insert the seal into the valve body.
8. Turn the valve body over and repeat for the second seal.
9. Dip the body with seals into methanol to wet the sealing surfaces.
10. Slide the new seal body over the spool.
11. Remove the insertion bullet from the end of the spool.
12. Remove the Oring from the nose cap of the valve using a small, pointed object.
13. Wet the new Teflon Oring in methanol and press it onto the small, raised diameter on the nose cap.
14. Slide the nose cap over the spool.
15. Align the ports vertically in the valve body.
16. Align the mounting holes in all parts, reinstall the four mounting screws, and tighten them evenly.
17. Slide the valve assembly into the Fluid Pak bracket and fasten that into place with the two Torx head screws.
18. Reconnect the tubing to the valve.
19. Secure the valve cabling with a cable tie.
20. Power off the instrument.
21. Replace the top cover on the instrument.
Verification:
1. Power on the instrument.
2. Ensure the initialization process completes without errors.
3. Run a purge and compression test to verify proper operation of the HPMVs.
Additional Notes
* Ensure all seals are properly seated and wetted with methanol during installation.
* If the valve continues to exhibit issues after rebuilding, consider replacing the entire V1 valve assembly (Part Number: WAT045438)