How to Create a Process Only Sample Set - Tip237
OBJECTIVE or GOAL
There are times when taking previously acquired data and processing them as a group is desirable, particularly when doing content uniformity or dissolution. You can combine Sample Sets, Injections or Channels into a Process Only Sample Set, then process and generate a Result Set.
Here's how:
ENVIRONMENT
- Empower
- Empower Tip of the Week #237
PROCEDURE
STEP 1
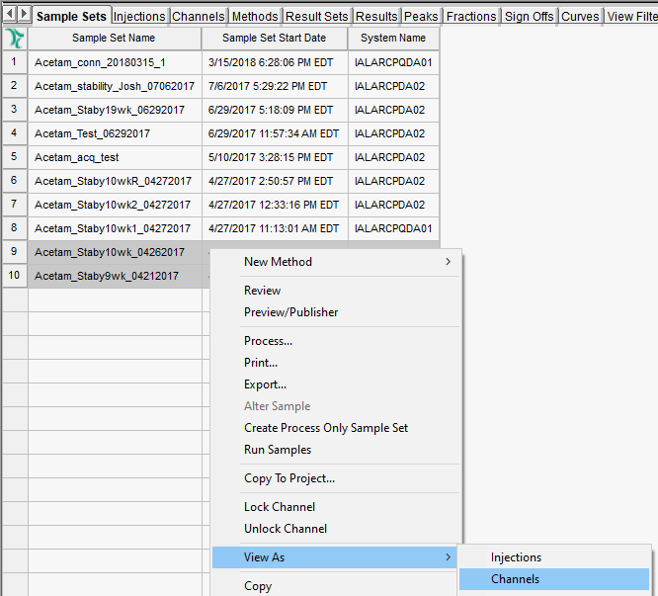
Highlight the Sample Sets of interest, right click, and select ‘View As, Channels’ (figure 1).
STEP 2
Highlight the channels of interest, right click, and select ‘Create Process Only Sample Set’ (figure 2).

STEP 3
Enter a name for the Process Only Sample Set and click ‘OK’ (figure 3).

STEP 4
A window opens, similar to the Alter Sample window. Add any needed information and/or make any necessary changes. Save all changes (figure 4).

STEP 5
You will be required to enter a comment (figure 5).

STEP 6
On the Sample Sets tab of the project, create a View Filter that contains the ‘Sample Set Type’ field. Now you can see which Sample Sets were acquired in the normal fashion and which ones are Process Only Sample Sets (figure 6).

STEP 7
Process the ‘Process Only Sample Set’ and bring the Result Set into Review. It now looks like a typical Result Set (figure 7).

STEP 8
You can report the Result Set as well. Here you see the overlay of the chromatograms (figure 8).

STEP 9
View summary tables for ‘Peak Area’ and ‘Retention Time’ summarizing the results (figure 9).

ADDITIONAL INFORMATION
Final Note: You can use either the Pro or QuickStart interface for this tip.