Installing the Tool-Free ESI probe assembly
Requirements:
• Ensure that the probe adapter is installed on the source, with the probe adapter cap removed. See Installing the probe adapter.
• To minimize delays and dispersion, select the shortest probe assembly to connect the diverter valve to the probe.
Recommendation:
- To connect the probe assembly directly to the fluidics valve, use the 500-mm ESI probe assembly.
Notice: Do not adjust the length of the probe assembly. Cutting the PEEKsil tubing renders the probe assembly unusable.
Probe assembly:
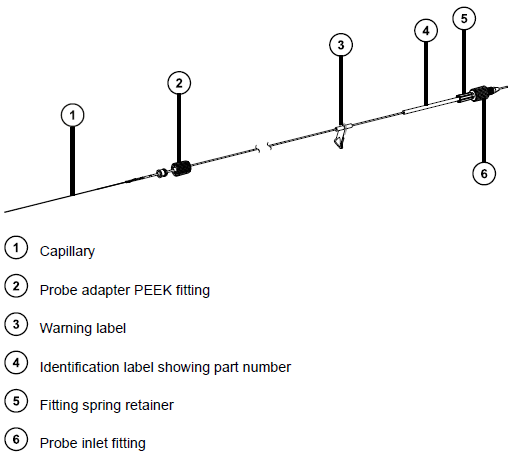
Note: The high-voltage warning label  does not appear on all probe assemblies.
Required materials
- Chemical-resistant, powder-free gloves.
To install the probe assembly:

Warning: To avoid personal contamination with biologically hazardous or toxic compounds, wear clean, chemical-resistant, powder-free gloves when performing this procedure.

Warning: To avoid electric shock, do not insert any item into the probe cap aperture when the probe cap is fitted to the instrument.
 Notice: To avoid damaging the probe assembly, take care when inserting the capillary into the probe adapter. Do not use force.
Warning: To avoid harmless, static-like electric shock, ensure that the mass spectrometer is in Standby mode before you touch any of its external surfaces that are marked with this high voltage warning symbol.
- To prepare for installing a probe assembly, press together the probe adapter cap release buttons, in the direction shown by the arrows in the following figure, and lift the probe adapter cap off the probe adapter.

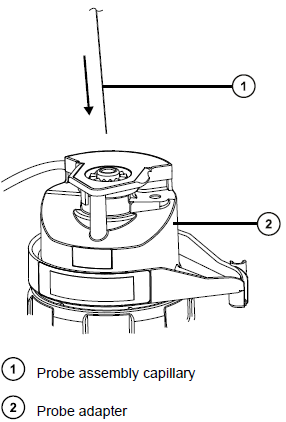
- Carefully insert the probe assembly capillary into the probe adapter.
Tip: To aid with insertion, turn the capillary gently as you insert it, feeding the entire capillary into the probe adapter.
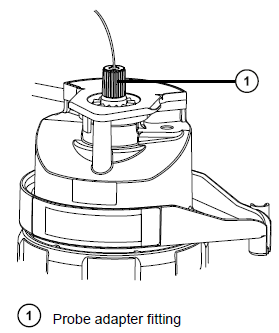
- Screw the probe adapter fitting into the probe adapter, finger-tight only, until you hear a click.
Tip: The probe adapter fitting varies in size depending on the probe assembly type. If you cannot fit the probe adapter cap fully, as described in step 6, ensure that you are installing the correct probe assembly. For example, the Unispray probe assembly will not fit the tool free probe adapter.
- Tilt the probe adapter cap so that the ball bearing is located in the recess at the bottom of the aperture, and then insert the probe assembly tubing through the aperture.
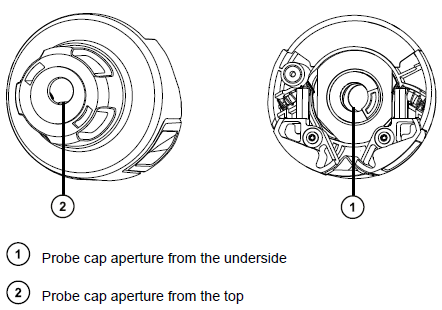
Tip: The probe assembly tubing can pass through the aperture only when the ball bearing is located in the recess at the bottom and does not block the aperture. To ensure that the probe assembly does not contact the high voltage inside the probe adapter, the ball bearing prevents you from installing the probe assembly when the probe adapter is fitted to the source enclosure.

- Slide the probe adapter cap along the probe assembly, over the probe adapter inlet fitting.
- Push the probe adapter cap onto the probe adapter until it clicks.
Tips:
- Do not squeeze the probe adapter cap release buttons when fitting the probe adapter cap.
- Ensure that the probe adapter cap is correctly seated and that both release buttons engage with the probe adapter, producing a click.
- If you cannot fit the probe adapter cap fully, ensure that you are installing the correct probe assembly type.

Note: If you fit the probe adapter cap when the source enclosure is closed and the mass spectrometer is in Operate mode, the high-voltage supply to the probe turns on and the instrument performs a pressure test. To prevent gas from escaping audibly through the probe adapter, ensure that the instrument is not in Operate mode until a probe assembly is installed. You must remove the probe adapter cap before installing the probe assembly.
Tip: If you are not immediately connecting the probe assembly to the inlet system, insert the probe inlet fitting into the inlet fitting holder.

- Connect the probe inlet fitting to the inlet system.