Disassembling the source ion block assembly
Required materials
- Chemical resistant powder gloves
- Combined 2.5-mm hex wrench and cone extraction tool
- O-ring removal kit
To disassemble the ion block assembly:

Warning: To avoid personal contamination with biologically hazardous, toxic, and corrosive materials, wear chemical-resistant, powder-free gloves when performing this procedure.
- Ensure the source isolation valve is closed.

- Grasp the cone gas nozzle handle, and use it to rotate the sampling cone assembly through 90 degrees.
-
Slide the sampling cone assembly out of the ion block assembly.
-
Use the combined 2.5-mm hex wrench and cone extraction tool to loosen the 2 captive screws securing the ion block cover plate.
Important: To ensure correct operation of the ion block assembly after reassembly:
-
do not remove the sampling cone assembly retaining blocks.
-
do not adjust the screws securing the sampling cone assembly retaining blocks.
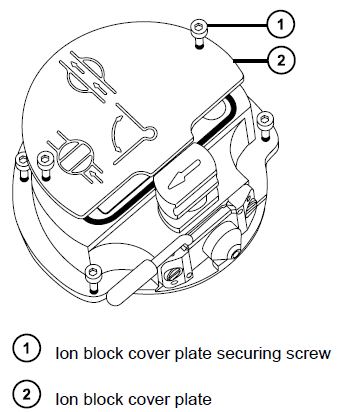
- Remove the ion block cover plate.
-
Grasp the isolation valve, and pull it out of the ion block.

- Use the O-ring removal kit to carefully remove the isolation valve O-ring (see Removing O-rings and seals).
Warning: To avoid spreading contamination with biologically hazardous, toxic, and corrosive materials, dispose of all waste materials according to local environmental regulations.
- If the isolation valve O-ring shows signs of deterioration or damage, dispose of it in accordance with local environmental regulations.
-
Use the combined 2.5-mm hex wrench and cone extraction tool to loosen the captive PEEK terminal block securing screw.
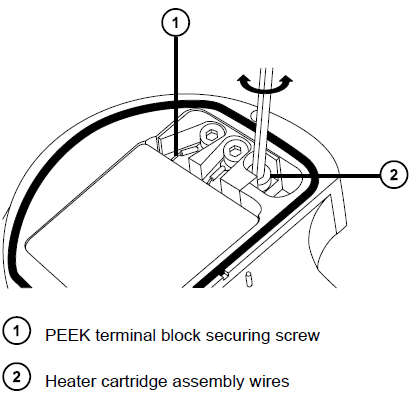
 Notice: To avoid damaging the heater cartridge assembly wires, do not bend or twist them when removing the assembly and ceramic heater mounting block from the ion block.
-
Carefully remove the PEEK terminal block and ceramic heater mounting block, complete with heater cartridge assembly, from the ion block.
Tip: You can invert the ion block assembly to facilitate this process.

-
Use the O-ring removal kit to carefully remove the cover seal from the ion block (see also Removing O-rings and seals).

- Use the O-ring removal kit to carefully remove the cone gas O-ring from the ion block.
Warning: To avoid spreading contamination with biologically hazardous, toxic, and corrosive materials, dispose of all waste materials according to local environmental regulations.
-
If the cover seal or cone gas O-ring shows signs of deterioration or damage, dispose of it in accordance with local environmental regulations.