205000137 Waters 515 Pump Drip Tray Kit
ENVIRONMENT
- 515 HPLC Pump
CONTENT
Waters 515 Pump Drip Tray Kit, Part Number 205000137
| Part Number | Quantity | Item | Image | Description/Location |
|---|---|---|---|---|
|
|
1 |
CONNECTOR, MALE, 1/8"-npt, 1/4" ID TUBE |
 |
Stainless Steel connector to the drip tray to the waste tubing. |
|
415000311 |
1 |
DRIP PAN, 515 |
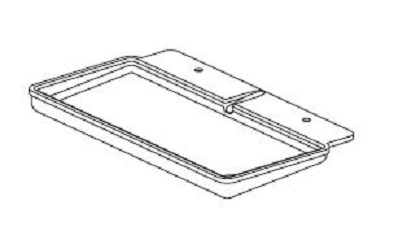 |
515 drip pan assembly |
|
415000317 |
4 |
FOOT W/WASHER, .75 TALL .62 OD |
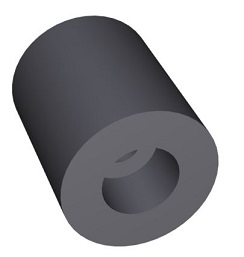 |
Feet to increase the height to allow for the drip tray |
|
|
4 |
SCREW, PAN HEAD, M4 X 25 |
 |
Screws to attach 415000317 |
|
|
72" |
TUBING, .375 OD X .250 ID, TYGON |
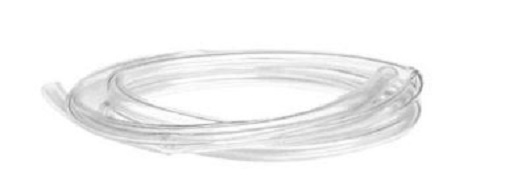 |
Waste tubing |
|
WAT024170 |
6" |
TAPE, TEFLON SEALANT |
 |
Teflon tape to be used on 410000705) |
ADDITIONAL INFORMATION
515 HPLC Pump Operator's Guide
These instructions are intended for the installation of the Waters 515 Pump drip tray onto the Waters 515 Pump, using installation kit, part number 205000137
.
- Apply three turns of thread sealant tape (WAT024170) to fitting (410000705) and thread fitting into the drip tray (415000311) until fitting is flush with the inside of the drip tray.
- Press tubing (430000604) onto the barbed end of the fitting (410000705).
- Gently flip the 515 Pump on its back, such that the feet are pointing up.
- With the front of the unit closest to you, remove all four feet using a T#20 Torx key. Discard feet and screws.
- Attach four new feet (415000317) with the new screws (WAT411425), taking care not to compress the feet by over-tightening.
- With the T#20 Torx key remove the two Torx screws ahead of the front feet that hold on the front bezel. Save these screws.
-
Place the drip tray on the 515 Pump with fitting pointing up on the left front corner, aligning drip tray with screw holes. Re-insert and tighten screws saved from step 6 such that the screws hold the drip tray onto the Pump.
-
Gently turn the 515 Pump back onto its feet, taking care to make sure that the fitting on the drip tray hangs over the front of the bench if the Pump is not stacked on top of another module.
-
Route the end of the drain tube (430000604) to a waste container. Trim if necessary, to avoid and drips in the flow path, which might create a trap and cause a backup.