How to perform valve leak test on Alliance - WKB81003
Article number: 81003
OBJECTIVE or GOAL
Perform valve leak test on Alliance systems.
ENVIRONMENT
- Alliance HPLC System
- 2695 Separations Module
- 2695D Dissolution Separations Module
- 2795 Separations Module
PROCEDURE
Performing the Valve Leak Test
The Valve Leak Test:
- Tests the Sample Inlet Valve (V1) and Syringe Valve (V2) of the sample management system.
- Tests the upper and lower side of the needle seal pack for pressure leaks.
To perform the Defrost Sample Heater/Cooler procedure, highlight Defrost in the Other Diagnostics screen, and then press OK. The Defrost Sample Cooler screen appears.
Perform the Valve Leak Test when you:
- Suspect leakage in the sample management valves or upper and lower needle seal pack.
- Perform maintenance on the sample management system.
Required Materials
- Pin plug
- 5/16-inch open-end wrenches (2)
- Waste container
Procedure
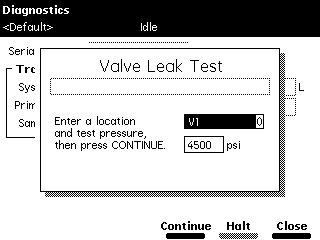
- Select Valve leak test in the Other Diagnostics screen, and then press OK screen. The Valve Leak Test screen appears (see the following image).
- Disconnect the red outlet line from the sample management system and use the pin plug to plug the red outlet line.
- Collect the solvent runoff in an appropriate waste container.
- Press Enter to display the test location selections, and then select the valve to be tested (V1 or V2) or the needle seal pack position (Above seal or Below seal).
- Select the test pressure (usually 4500 psi), and then press Continue.
- Follow the instructions in the subsequent Valve Leak Test screens to complete the test.

Valve Leak Test Diagnostic Screen

