How to replace the vent valve on an ACQUITY QSM - WKB120633
OBJECTIVE or GOAL
Replace the vent valve on a QSM.
ENVIRONMENT
- ACQUITY UPLC H-Class
- ACQUITY UPLC H-Class Quaternary Solvent Manager (QSM)
- ACQUITY UPLC H-Class Quaternary Solvent Manager (QSM-R)
- ACQUITY UPLC BSM
- ACQUITY UPLC I-Class BSM
- ACQUITY UPLC I-Class BSM Plus
- ACQUITY UPLC H-Class Quaternary Solvent Manager (QSM) Plus
- ACQUITY UPLC I-Class
PROCEDURE
-
In the ACQUITY UPLC console, select the solvent manager from the system tree.
-
In the solvent manager information window, click Interactive Display.
-
In the solvent manager interactive display dialog box, select Control (on the right-hand side of the console).
-
Ensure that the vent valve is set to the Vent position.
Tip: To change the setting to the vent position, click the underlined vent-valve position, and select Vent.
-
Open the solvent manager’s door and, using a 1/4-inch wrench, remove the fittings attached to the vent valve cartridge.
-
Using a 2-mm hex wrench, remove the hex screw at the 10 o'clock position on the vent valve cartridge.
-
Remove the vent valve cartridge from the vent valve by pulling straight forward.
-
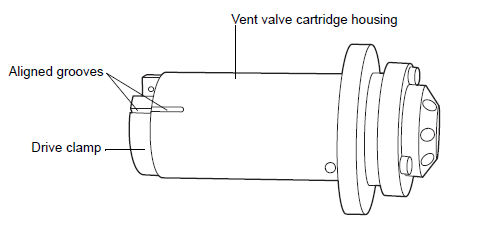
Ensure that the groove in the cartridge housing aligns with the groove on the drive clamp.
10. Insert the new vent valve cartridge, insert the 2-mm hex screw, and replace all fittings.
ADDITIONAL INFORMATION

