How to create a method to export Area values with sample name on vertical axis and peak name on horizontal axis with Empower 3 - WKB85134
OBJECTIVE or GOAL
With Empower 3, create an export method that exports the Area values with the sample name on vertical axis and the peak name on horizontal axis.
ENVIRONMENT
- Empower 3
PROCEDURE
1. From the Project window, select File > New Method > Export Method.
2. Open the "Fields" tab on the Export Method Editor screen (settings on "Raw data" and "Report" tabs will not be modified).
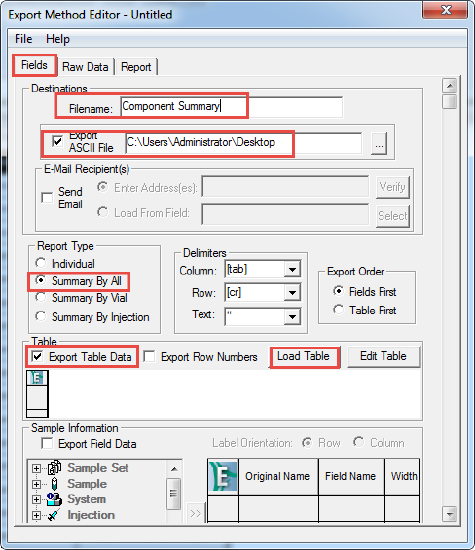
3. The required settings on the "Field" tab are as follows:
・Filename input
・Select "Export ASCII File" and specify the export destination. (We recommend that you first use the desktop of the PC you are operating.)
・Select "Summary By All" for Report type
・Enable “Export Table Data", select "Area Component Summary" from "Load Table" button, and click "Open”
4. Name and save the export method.
5. Right-click on the result set and select "Export".
6. Select "Use specified export method" in the "Export" field on the Background Processing/Report screen,
and specify the export method saved in step 4.
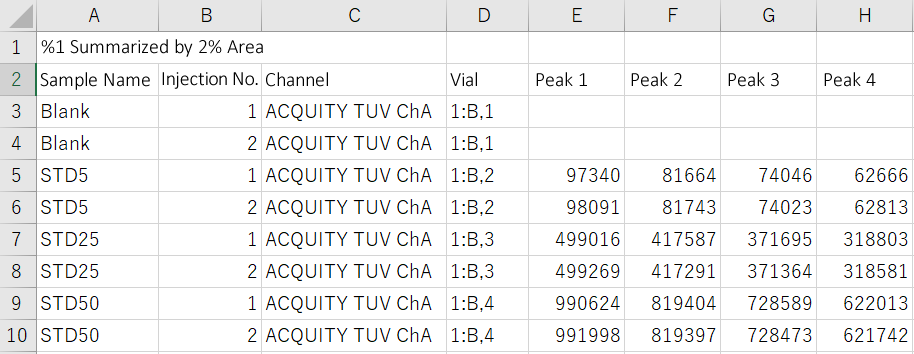
7. Open the text file created in the location specified by the export method with Excel.
* When the export file created by the above procedure is opened in Excel, the area value is displayed with the sample name on the vertical axis and the peak name on the horizontal axis as shown below.
ADDITIONAL INFORMATION
Can Empower 3 export the result as a CSV file? - WKB32504
id85134, EMP2LIC, EMP2OPT, EMP2SW, EMP3GC, EMP3LIC, EMP3OPT, EMP3SW, EMPGC, EMPGPC, EMPLIC, EMPOWER2, EMPOWER3, EMPSW, SUP