Replacing the ion block source heater
Replace the ion block source heater if it fails to heat the ion block when the instrument is pumped-down (evacuated).
Required materials
- Chemical-resistant, powder-free gloves
- Needle-nose pliers
- Combined 2.5-mm hex wrench and cone extraction tool
- New ion block source heater assembly
To replace the ion block source heater:
Warning: To avoid personal contamination with biologically hazardous, toxic, and corrosive materials, wear chemical-resistant, powder-free gloves when performing this procedure.
- Remove the ion block assembly from the instrument (see Removing the ion block assembly from the source assembly).
-
Ensure that the isolation valve is closed.

-
Use the combined 2.5-mm hex wrench and cone extraction tool to loosen the two captive screws securing the ion block cover plate.

- Remove the ion block cover plate.
- Use the combined 2.5-mm hex wrench and cone extraction tool to loosen the captive PEEK terminal block securing screw.

Notice: To avoid damaging the heater cartridge assembly wires, do not bend or twist them when removing the assembly and ceramic heater mounting block from the ion block.
- Carefully remove the PEEK terminal block and ceramic heater mounting block, complete with heater cartridge assembly, from the ion block.
Tip: You can invert the ion block assembly to facilitate this process.

- Use the combined 2.5-mm hex wrench and cone extraction tool to loosen the two screws securing the heater wires to the PEEK terminal block.
- Disconnect the heater cartridge wires from the PEEK terminal block.
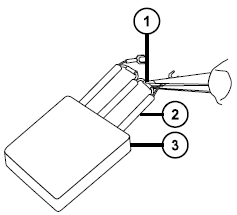
- Use the needle-nose pliers to gently grasp the heat-shrink tubing on the heater cartridge assembly and slide the assembly out of the ceramic heater mounting block.


- Dispose of the heater cartridge assembly.
Notice: To avoid damaging the heater cartridge assembly wires, do not bend or twist them when removing the assembly and ceramic heater mounting block from the ion block.
- Use the needle-nose pliers to gently grasp the heat-shrink tubing on the new heater cartridge assembly and slide the assembly into the ceramic heater mounting block.
- Use the needle-nose pliers to position the heater cartridge’s wiring ring tags fully under their securing screws.
- Use the combined 2.5-mm hex wrench and cone extraction tool to tighten the two wiresecuring screws.
- Fit the PEEK terminal block and ceramic heater mounting block, complete with heater cartridge assembly, to the ion block.
- Use the combined 2.5-mm hex wrench and cone extraction tool to tighten the captive PEEK terminal block securing screw.
- Fit the ion block cover plate to the ion block assembly, and then use the combined 2.5-mm hex wrench and cone extraction tool to tighten the two captive screws securing the ion block cover plate.
- Fit the ion block assembly to the instrument (see Fitting the ion block assembly to the source assembly).

