Off After Low Emission vacuum error on the AutoSpec - WKB55829
Article number: 55829
SYMPTOMS
- Ion gauge "Off After Low Emission" error message appears in Tune Status and the Vacuum Control page
- Cannot switch on the ion gauge; no vacuum reading is possible
ENVIRONMENT
- AutoSpec
- AutoSpec Premier
CAUSE
The ion gauge filament is open circuit and/or shorting to ground or the grid.
FIX or WORKAROUND
- Check the resistance of your meter leads before making any measurement; touch the black and red measurement leads together.
- The resistance reading should be very low—optimally, less than one Ohm.
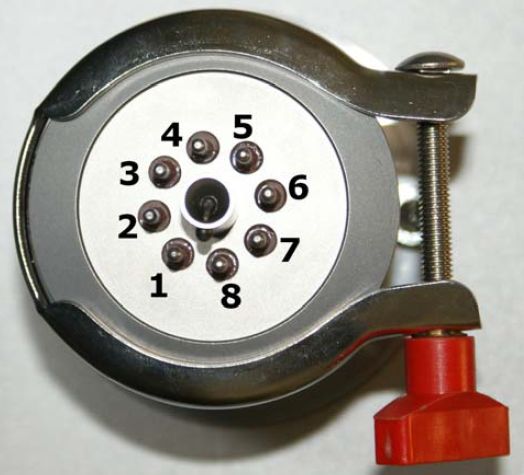
- Measure the resistance between pins 7 and 8 on the ion gauge end flange.
- Expect to see a resistance less than 1 Ohm, take into account the resistance of the meter leads as above. This would show the filament is good.
- If the resistance is very high/infinite - "open circuit" - the filament has failed and must be replaced.
- Part number for the Ion Gauge Filament: 7991802 - IR23 FILAMENT (VIG 8)
- Part number for the complete Ion Gauge Assy: 700012500 - GAUGE ION VIG 8 KF40
- If the resistance is good however, about 1 Ohm, suspect the filament is incorrectly connected - shorting - to ground or the Ion Gauge Grid..
- Measure the resistance from either pin 7 or pin 8 to the instrument housing/ground.
- Expect to see a high, open-circuit resistance. This is the normal condition.
- A low resistance indicates a short circuit, which needs to be rectified.
- Measure the resistance from either pin 7 or pin 8 to all the remaining pins - 1 through to 6 and then the central pin.
- Expect to see a high, open-circuit resistance. This is the normal condition.
- A low resistance indicates a short circuit, which needs to be rectified.
- It is possible that no resistance will be measured when making the resistance checks.
- The filament may be in close proximity to the instrument housing/grid and only make a real connection when voltage and current are supplied.
- If the Analyser region still shows the error, test both ion gauges for errors:
- Disconnect the Analyser 2 ion gauge connector (BB350), and try to turn on the Analyser 1 ion gauge.
- If a reading is seen, the problem is in the Analyzer 2 ion gauge.
- Likewise, disconnect the Analyser 1 ion gauge connector (BB150), and try to turn on the Analyser 2 ion gauge
- If a reading is seen, the problem is in the Analyzer 1 ion gauge.
- Disconnect the Analyser 2 ion gauge connector (BB350), and try to turn on the Analyser 1 ion gauge.
- The ion gauge must be removed following all vacuum handling procedures, and the short must be cleared by carefully adjusting the filament with a small screwdriver or tweezer.
- NOTE: Never touch the ion gauge filament with bare hands. The filament is thorium-coated and mildly radioactive.
ADDITIONAL INFORMATION
See article WKB96022 on how an ion gauge works.
id55829, AUTOSPEC, AUTOSPEC-P