How to correctly install compression screws and ferrules on HPLC / UPLC metal tubing - WKB109755
Article number: 109755
OBJECTIVE or GOAL
How to correctly install compression screws and ferrules on HPLC / UPLC metal tubing
ENVIRONMENT
- ACQUITY APC
- ACQUITY APC Isocratic Solvent Manager
- ACQUITY APC Sample Manager - FTN
- ACQUITY Arc
- ACQUITY Arc Premier
- ACQUITY Arc Sample Manager FTN-R
- ACQUITY UPLC
- ACQUITY UPLC BSM
- ACQUITY UPLC Column Manager
- ACQUITY UPLC H-Class
- ACQUITY UPLC H-Class Bio
- ACQUITY UPLC H-Class Quaternary Solvent Manager (QSM)
- ACQUITY UPLC I-Class
- ACQUITY UPLC H-Class PLUS
- ACQUITY UPLC H-Class PLUS Bio
- ACQUITY UPLC I-Class PLUS
- ACQUITY UPLC M-Class
- ACQUITY UPLC Sample Manager
- ACQUITY UPLC Sample Manager - Flow Through Needle PLUS (SM-FTN PLUS)
- ACQUITY Premier System
- Alliance
PROCEDURE
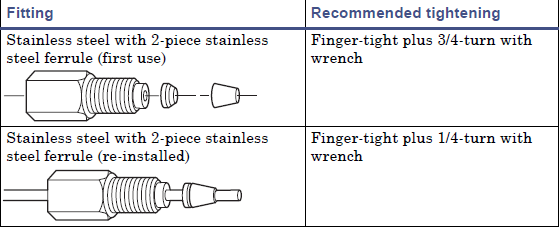
- "Thread" the tubing through the compression screw and ferrule and ensure the tubing is fully bottomed in the fitting hole.
- Finger-tighten the screw until it doesn’t rotate any further and then make a mark on the screw.
- Add 3/4-turn using a wrench while checking the mark on the screw.
- Remove the screw and ferrule and check ferrule is secure.
- Re-install the screw and ferrule, finger-tighten and add 1/4 turn using a wrench.
ADDITIONAL INFORMATION