How to set up MSConvert with waters_connect with UNIFI 2.1.2 (API 2.0) and later - WKB237731
OBJECTIVE or GOAL
Interface MSConvert with waters_connect via the waters_connect API so that MSConvert can be used to export and convert data to different formats when both waters_Connect and MSConvert are installed on the same PC
ENVIRONMENT
- waters_connect workstation
- MSConvert installed on the waters_connect workstation
- waters_connect 4.0.0
- waters_connect 3.7.0
- waters_connect 3.6.0
- waters_connect 3.5.0
- waters_connect 3.3.0
- waters_connect 3.2.0
- waters_connect 3.1.0
- waters_connect with UNIFI 3.0.0
- waters_connect with UNIFI 2.1.2 Rev B and API 2.0
PROCEDURE
- If using waters_connect with UNIFI 2.1.2, and if the API has not already been installed, install API 2.0 from the rev B installation media.
- When installing the API, always enable TLS unless the customer has a specific reason for not wanting to do so.
- NOTE: In waters_connect with UNIFI 3.0.0 and waters_connect 3.1, the API and API client configuration tool are automatically installed by the platform services installer. There is no separate API installation required.
- Install Proteowizard MSConvert 3.0.22 or later.
- The installer can been downloaded from Sourceforge.
- In the Windows 10 search option, type About Your PC, open About Your PC, and make note of the PC name.
- This is MY_PC_NAME at step 17.
- On the waters_connect PC, navigate to C:\Program Files\Waters\waters_connect\ApplicationRegistrationTool.
- Right-click the ApplicationRegistrationTool.App executable and select Run as administrator.
- Result: A console window opens.
- If no console window opens, customers should submit an iRequest referencing wkb202576. Waters employees should follow the link in the Internal notes section of this article.
- Type your waters_connect username and press ENTER.
- Type your waters_connect password and press ENTER
- Result: A summary page displays any previously registered third-party applications,
- followed by a message asking you what you want to do next.
- Type R to register a client, and press Enter.
- When it asks you for a name for the application client, type resourceownerclient.
- You will then be asked to provide a flow for the application. MSConvert uses the ResourceOwnerPassword flow, so type R and press return.
- It will the ask you to provide an access token. Type R for reference token and press return.

- You will then be asked to provide a secret for the application. Type secret and press return.
- NOTE - Skyline appears to have been hard coded to only allow you to use the word secret as the application secret
- You should then get a message telling you that the application client has been registered.
- Launch the MSConvert application on the UNIFI workstation by clicking on the icon in the Windows Start menu.
- Click on “Browse Network resources” and select “UNIFI”. This opens the MSConvert UNIFI browser.
-
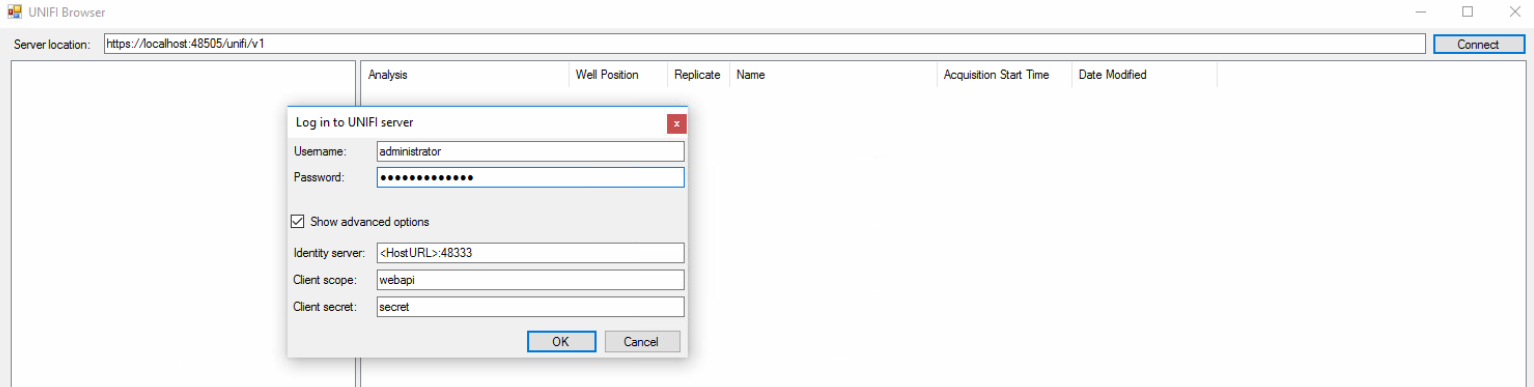
In the MSConvert UNIFI browser interface Server location field, type https://localhost:48505/unifi/v1.
-
NOTE: MSConvert may auto-populate this field, in which case leave it alone.
-
NOTE: If TLS was not enabled during API installation, use http in the location field (e.g., http://localhost:48505/unifi/v1).
-
-
Press Connect.
-
In the "Log in to UNIFI Server" window that appears, specify the UNIFI administrator account username and password (by default, these are both "administrator").
-
If the version of MSConvert has the "Show advanced options" check box, select it
-
In the identity server field, type <Host URL>:48333.
-
NOTE: MSConvert may auto-populate this field, in which case leave it alone.
-
TIP: You may need to change this to https://localhost:48333.
-
-
In the Client Scope field, type webapi.
-
in the Client Secret field, type secret (see step 11).
ADDITIONAL INFORMATION
If you want to configure MSconvert on a waters_connect network system, or are runnign MSconvert on a 3rd aprty PC connected to a waters_Connect workstation over a network see wkb286087.
Also see the video in the How-To Series.