How to Use the Walk-Up Interface in Empower - Tip239
OBJECTIVE or GOAL
The Walk-Up Interface is a simplified interface in Empower for easy acquisition and processing of samples. It is well suited for high thru put environments. All the configuration and method creation are done prior to the user accessing the system to keep things simple.
The user in this case only has access to the Walk-Up Interface.
ENVIRONMENT
- Empower
- Empower Tip of the Week # 239
PROCEDURE
In this first example, we want to run one sample, and have it quantitated against a calibration curve (this could be LC, GC or GPC).
STEP 1
Double click the Empower shortcut, Enter ‘User Name’ and ‘Password’, click ‘OK’ (figure 1).

STEP 2
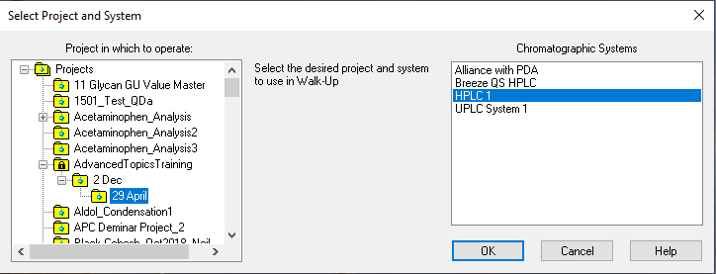
Select a ‘Project’ on the left and select a ‘chromatographic system’ on the right, click ‘OK’ (figure 2).
STEP 3
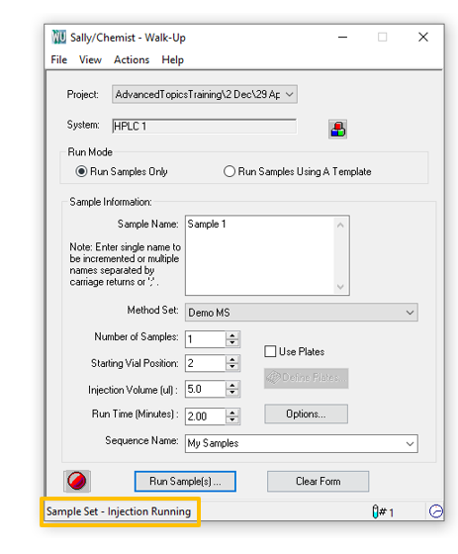
The Walk-Up Interface opens and defaults to ‘Run Samples Only’ (figure 3).

STEP 4
Enter a ‘Sample Name’ and select a ‘Method Set’ (NOTE: The run mode is determined by which methods are in the Method Set. For example, if you want to Run and Report, you must select a Method Set with an Instrument Method, Processing Method and Report Method). Enter an ‘Injection Volume’, enter a ‘Run Time’, and a ‘Sequence Name’. The ‘Options’ button allows entry for ‘Dilution’ and ‘Sample Weight’, if needed. Click ‘OK’ and click ‘Run Samples’ (figure 4).

STEP 5
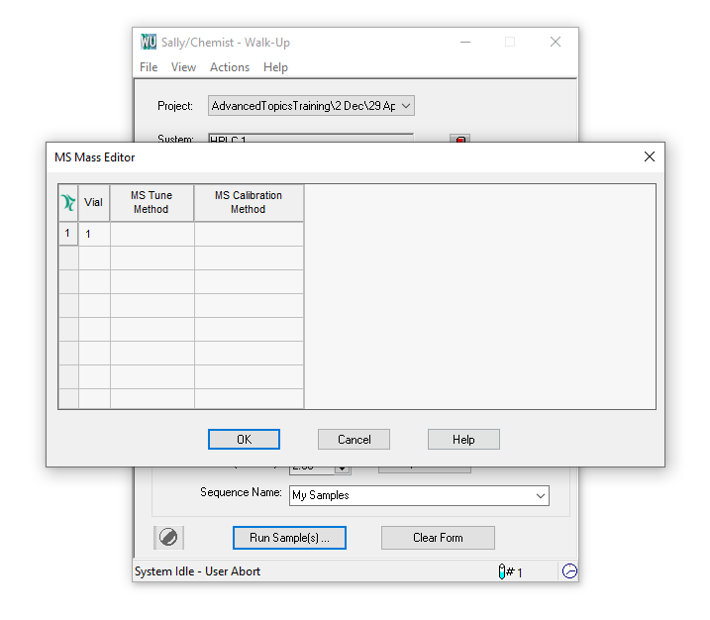
If the MS Mass Editor window appears, click ‘OK’ (figure 5).
STEP 6
If you are in ‘Run and Report’ mode, select the ‘printer’, click ‘OK’ (figure 6).

STEP 7
A message appears as a reminder to add the vial in the autosampler. Click ‘OK’ (figure 7).

STEP 8
In the lower left corner of the screen, you will see the message change from ‘Setting Up’ to ‘Waiting for Injection’ (figure 8).

STEP 9
During the run, the message displays ‘Injection Running’ and eventually will display ‘Complete’ once the run is finished (figure 9).
In the second example, we want to run a series of samples using a Sample Set Method Template.
STEP 10
Once logged in using the Walk-Up Interface, select ‘Run Samples Using a Template’. Highlight the template from the list, enter a ‘Sequence Name’ and click ‘Run Samples’. The Variable window opens prompting to enter the necessary information, in this example, it is the ‘Number of sample vials’ and ‘Vial starting position in tray’. Click ‘Next’ (figure 10).

STEP 11
Continue entering any necessary information and on the last screen, click ‘Finish’. The sequence will begin (figure 11).

It’s that easy!
ADDITIONAL INFORMATION
id207388, EMP2LIC, EMP2OPT, EMP2SW, EMP3GC, EMP3LIC, EMP3OPT, EMP3SW, EMPGC, EMPGPC, EMPLIC, EMPOWER2, EMPOWER3, EMPSW, SUP